We only recommend products and services we wholeheartedly endorse. This post may contain special links through which we earn a small commission if you make a purchase (though your price is the same).
I love sushi!
Although my mother made many delicious Asian-flavored meals from scratch when I was a child (Chinese stir fry, Asian chicken salad…), sushi wasn’t as accessible. The first time it graced my dinner plate, I fell in love!
Okay, maybe not the grilled eel or fried tofu options… But those aside, I love sushi because of its unique and stunning taste. My husband agrees, so early married life was filled with sushi indulgences!
Now, more than a decade later, our Real Food family of 7 loves sushi too!
Why is is so appealing? Homemade sushi is…
- a practical way to utilize and enjoy the raw, fresh harvests of our own gardens
- more affordable and nutritious than that of most restaurants
- a delicious way to include seafood, with all of its vitamins and minerals
- flexible, depending on family preference and availability
- allergy-friendly (just omit any ingredients that cause issues!)
- a way to incorporate the whole family in meal prep
- full of complex, wonderful flavors that expose our children to another culture’s foods
- a beautifully decorative meal
Are you convinced to make homemade sushi yet? Below I share a peek at how my family comes together to make sushi and memories all at the same time!

How To Make Real Food Sushi At Home
Supplies:
- at least 1 set of a sushi mat and paddle — perhaps multiple if you are a larger family
- chopsticks (optional)
- several bowls to hold sushi fillings and mix sauces
- knives and cutting boards on which to cut veggies and fish
For the rice:
- 3 cups dry short-grain brown rice (long-grain tends to be less sticky) — soaked before cooking for easier digestion
- 6 tablespoons whey, kefir, lemon juice (or other acid)
- 4 tablespoons rice vinegar
- 1 tablespoon Rapadura (or other unprocessed sugar)
For the sauces:
- fermented soy sauce or tamari
- “regular” mild sushi sauce (2 tablespoons mayonnaise + 2 teaspoons lemon juice)
- spicy sushi sauce (2 tablespoons mayonnaise + 2 teaspoons lemon juice + 1 to 2 teaspoons sriracha sauce)
- wasabi (Eden wasabi powder + hot water to form a paste)
For the fillings:
- nori sheets
- 1/4 to 1/2 cup sesame seeds
- 1 to 2 cups of each, thinly sliced: carrots, avocado, scallions, cucumber, red bell peppers, or other vegetables your family enjoys or harvests at home
- 1/2 to 1 cup ginger carrots, fermented (as shown in our Lacto-Fermentation eCourse or in Sally Fallon’s book, Nourishing Traditions)
- 1 to 2 pounds sashimi-grade fresh tuna, wild salmon or other fish, sliced in about 1/2-inch wide strips (about 2 to 3 inches long)
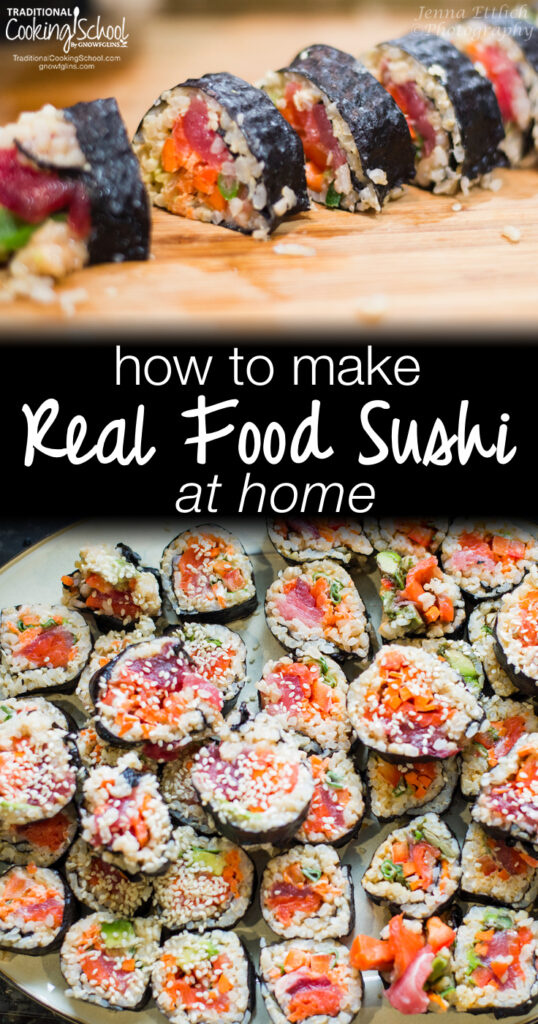
Makes about 15 long sushi rolls, then sliced into 8 to 10 bite-sized rolls.

Instructions
Soak your rice overnight before cooking. When done cooking, stir in rice vinegar and sweetener. Place in fridge when cooled.
If you have young children, we find that adults should slice and chop veggies and fish midday while also preparing sauces ahead of time. This decreases dinnertime crankiness and impatience!  Young children tend to enjoy getting in on the sushi rolling, though.
About an hour before dinnertime, pull out prepared veggies, fish, and rice. Unroll sushi mat and lay it flat. We lay ours atop a large cutting board. Will the outermost layer of your sushi be nori or rice? It’s easier to do nori, but either works! Choose either and lay it down first.
Now decide what you want in your roll — and how much. In the below picture, a very eager, hungry sushi-lover (okay, me!) chose all the possible veggies and fish, along with the spicy sauce, to go in her first roll.
Lay chosen items lengthwise across width of roll and spread either the regular or spicy sauce along the inner side of your pile of fillings (see photo).

Now you’re ready to roll (pun intended)! Lift up the fillings end of the roll over the top of the fillings themselves, using the mat as your guide and support. When this end touches down onto the rice, just past where your fillings had been laid, continue to roll.
Keep in mind: Your mat does not roll into your Sushi roll. It simply stays on the outside, constantly guiding your roll. When you get to the end, your mat should be laying over the Sushi roll. Hold both hands over the mat and gently squeeze the roll. This will carefully push the ingredients together into a nice, compact roll, which makes it easy to slice and eat.
This is what your roll will look like after rolling, but before slicing.

To slice, make sure you have a sharp knife! Slice the roll across the width into about 8 to 10 bite-sized rolls. Slice slowly and gently.
Just before eating, drizzle soy sauce or tamari atop your sushi rolls. For those who like a spicy life, spread a little wasabi over the top of each one too (or dip each roll into wasabi already on your plate).
Finally, after everyone has eaten their fill, you’ll probably have leftovers! Refrigerate the ingredients and make more homemade sushi rolls fresh for lunch the next day!
Comments are closed